Thursday, January 3, 2019

Integrating the workshop notes with the image

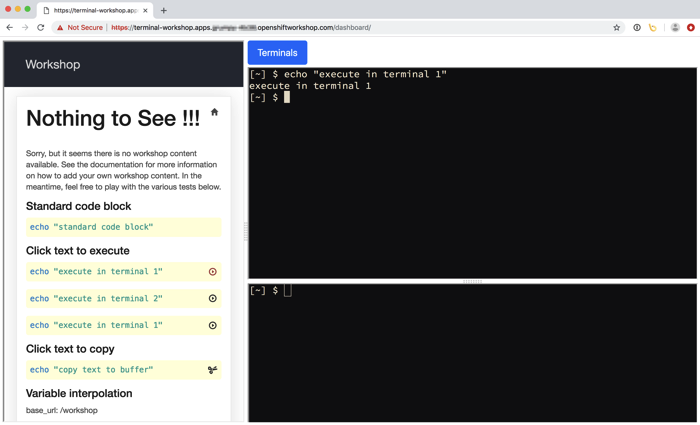
If you are still following this series of blog posts, we now have a dashboard for our workshop environment which combines workshop notes with the interactive terminal in the users browser.

This enabled us to have the instructions right next to the terminal where workshop attendees execute the commands. Further, it was possible to have it so that they need only click on the commands and they would be automatically executed in the terminal. This way they didn't need to manually enter commands or cut and paste them, both which can be prone to mistakes.

In this blog post we will look at how workshop notes for a specific workshop can be combined with the dashboard to create a self contained image, which can be deployed to a local container runtime, to OpenShift as a standalone instance, or using JupyterHub in a multi user workshop.

Building a custom dashboard image

We already covered previously the methods for creating a custom version of the terminal image which included additional command line tools and source files required for a workshop. The process is the same, but instead of using the terminal base image, the dashboard base image is used instead.

The two methods that could be used were to use the base image as a Source-to-Image (S2I) builder, or to build a custom image from a Dockerfile.

If you were running the build in OpenShift as an S2I build, with your files in a hosted Git repository, you could create the build by running the command:

  oc new-build quay.io/openshiftlabs/workshop-dashboard:latest~https://your-repository-url \
      --name my-workshop-dashboard

All you now need to know is the layout for the workshop notes so they are picked up and displayed correctly.

Layout for the custom workshop notes

The workshop notes were being hosted using Raneto, a knowledge base application implemented in Node.js. This was installed as part of the dashboard image which extends the terminal base image. When the image is started, Raneto will be started along side Butterfly and the proxy, with supervisord managing them all.

When building the custom image, the files for Raneto should be placed in the raneto sub directory. Within the raneto directory, the Markdown files for the workshop notes should be placed in the content subdirectory. Files should be Markdown files with .md extension.

The Markdown files can be placed directly into the content directory, or you can create further subdirectories to represent a category or set of multi part exercises.

By default, when pages are listed in the catalog on the home page for the workshop notes, they will appear in sorted order based on the names of the files. In the case of a subdirectory, they will be sorted within that category. If you need to control sorting, you can use meta data within the Markdown files to control relative file order, or using a sort file when needing to control the order that categories are shown. Check the Raneto documentation for more details on sorting.

If you want to replace the default home page which shows the categories and files within each category, you can provide an index.md file in the content directory.

A typical layout for the files might therefore be:

  raneto/content/index.md
  raneto/content/setup.md
  raneto/content/exercise-01/01-first-part-of-exercise.md
  raneto/content/exercise-01/02-second-part-of-exercise.md
  raneto/content/exercise-01/03-third-part-of-exercise.md
  raneto/content/finish.md

The index.md file would be a custom home page giving an overview of the workshop. The setup.md file would be any pre-requisite setup that may be required, such as logging in from the command line, creating projects, adding special roles etc. The finish.md file would be a final summary shown at the end of the workshop.

The subdirectories will then be where the exercises are kept, with the exercises broken into parts of a manageable size.

Defining the navigation path for the workshop

As Raneto is intended as being a knowledge base, it normally doesn't dictate a navigation path to direct the order in which pages should be visited. The templates used with the dashboard add to Raneto the ability to define a path to follow by specifying the navigation path as meta data in the Markdown files.

The metadata at the head of the index.md file would be:

  ---
  Title: Workshop Overview
  NextPage: setup
  ExitSign: Setup Environment
  Sort: 1
  ---

That for setup.md would be:

  ---
  Title: Setup Environment
  PrevPage: index
  NextPage: exercise-01/01-first-part-of-exercise
  ExitSign: Start Exercise 1
  Sort: 2
  ---

That for the last part of the last exercise:

  ---
  PrevPage: 02-second-part-of-exercise
  NextPage: ../finish
  ExitSign: Finish Workshop
  ---

And that for finish.md:

  ---
  Title: Workshop Summary
  PrevPage: exercise-02/02-second-part-of-exercise
  Sort: 3
  ---

The Title field allows the generated page title based on the name of the file to be overridden. The NextPage and PrevPage define the navigation path. The ExitSign allows you to override the label on the button at the end of a page which you click on to progress to the next page in the navigation path.

Each of the pages making up the exercises should similarly be chained together to define the navigation path to be followed.

Interpolation of variables into workshop notes

A set of predefined variables are available which can be automatically interpolated into the page content. These variables are:

  • base_url - The base URL for the root of the workshop notes.
  • username - The name of the OpenShift user/service account when deployed with JupyterHub.
  • project_namespace - The name of an existing project namespace that should be used.
  • cluster_subdomain - The sub domain used for any application routes created by OpenShift.

How these are set will depend on how the dashboard image is being deployed. Workshop notes will have to be tolerant of different deployment options and may need to specify alternate sets of steps if expected to be deployed in different ways.

To use the variables in the Markdown files, use the syntax:

  %username%

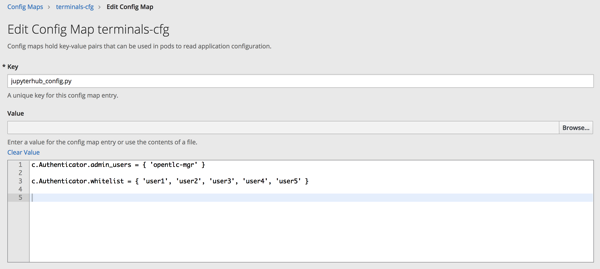
Additional variables for interpolation can be supplied for a workshop by providing the file raneto/config.js, including:

  var config = {
      variables: [
        {
          name: 'name',
          content: 'value'
        }
      ]
  };

  module.exports = config;

The contents of this config file will be merged with that for Raneto. The contents of the file must be valid Javascript code. You can use code in the file to lookup environment variables or files to work out what to set values to. The Javascript code will be executed on the server, in the container for the users environment.

This config file can also be used to override the default title for the workshop by setting the site_title attribute of the config dictionary.

Formatting and executable/copyable code blocks

You can use GitHub flavoured Markdown when needing to do formatting in pages.

In order to mark code blocks so that clicking on them will cause them to be copied to the first terminal and run, add execute or execute-1 after the leading triple back quotes which starts the code block, on the same line and with no space between then. If you want the second terminal to be used instead, use execute-2.

To have the contents of the code block copied into the copy and paste buffer when clicked on, use copy instead of execute.

Embedded images in workshop notes

The workshop notes can include embedded images. Place the image in the same directory as the Markdown file and use appropriate Markdown syntax to embed it.

  ![Screenshot](./screenshot.png)

Using HTML for more complex formatting

As with many Markdown parsers, it is possible to include HTML markup. This could be used to render complex tables, or could also be used in conjunction with Javascript, to add conditional sections based on the values passed in using the interpolated values. Note that any such Javascript is executed in the browser, not on the server.

Defining additional build and runtime steps

As when creating a custom terminal image using the S2I build process, you can define an executable shell script .workshop/build to specify additional steps to run. This can be used to check out Git repositories and pre-build application artifacts for anything used in the workshop. Similarly, a .workshop/setup script can be included to define steps that should be run each time the container is started.

Coming up next, deploying the full workshop

This post provides a rough guide on how to add workshop notes to the image when using the dashboard image in an S2I build. How to deploy the dashboard image for a multi user workshop is similar to what was described previously, you just need to supply the custom dashboard image instead of the custom terminal image.

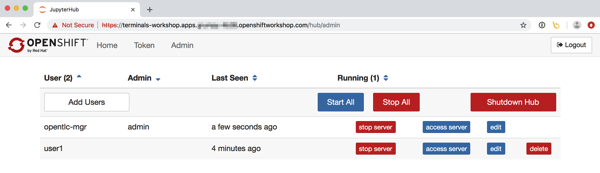
Deploying a multi user workshop where the users are known in advance by virtue of performing user authentication against OpenShift, isn't the only way that JupyterHub could be used to create a workshop environment.

In the next post we will revise how to deploy the multi user workshop using the custom dashboard image and the existing JupyterHub deployment, but we will have a look at an alternate scenario as well.

This scenario is where you accomodate anonymous users, where they are given an ephemeral identity in the cluster using a service account, along with a temporary project namespace to work in that is automatically deleted when they are done.

Wednesday, January 2, 2019

Dashboard combining workshop notes and terminal

The workshop environment described so far in this series of posts only targeted the problem of providing an in browser interactive terminal session for workshop attendees. This approach was initially taken because we already had a separate tool called workshopper for hosting and displaying workshop notes.

I didn't want to try and modify the existing workshopper tool as it was implemented in a programming language I wasn't familiar with, plus starting with it would have meant I would have had to extend it to know about user authentication, as well as add the capability to spawn terminals for each user which would be embedded in the workshopper page.

In the interests of trying not to complicate things and create too much work for myself, I therefore went the path of keeping the per user terminal instances completely separate from the existing tool. Now that I have deployment of terminals for multiple users working using JupyterHub as the spawner, what can be done about also hosting the workshop notes in a combined dashboard view.

Self contained workshop in a container

There are a couple of different approaches I have seen used to create these dashboard views which combine workshop notes with a terminal.

The first way, is to have a single common web site which provides the workshop notes. A user would visit this web site, going through a login page if necessary. Once they have been assigned an identifier, a backend instance for the terminal would be dynamically created. The common web site would embed the view for that terminal in the dashboard for that user, along with the workshop notes.

The second way, has the common web site only be a launchpad, with it dynamically creating a backend instance which hosts a web application which provides both the workshop notes and the terminal. That is, each user has their own instance of the application hosting the workshop notes, rather than it being provided by a single frontend application.

In both cases, depending on what the training system was for, the backend could have used a virtual machine (or set of virtual machines) for each user, or it could have used containers hosted on some container platform.

Whatever they use, these were always hosted services and the only way to do the workshop, was to go to their service.

When we run workshops, we don't have an always running site or infrastructue where someone wanting to do the workshop could go. We would host the workshop notes and terminals in the one OpenShift cluster where workshop attendees are also running the exercises for the workshop. When the workshop was over, the OpenShift cluster would be destroyed.

At the end of the workshop, we would inevitably be asked, how can I go through the workshop later, or can I share the workshop with a colleague so they can do it. Because it was an ephemeral system, this wasn't really possible.

One of the goals I had in mind in coming up with what I did, was the idea that everything you needed was self contained, with the container image being the packaging mechanism. So although we might run a multi user workshop and use JupyterHub as a means of spawning each users environment with the interactive terminal, you weren't dependent on having JupyterHub.

You have already seen this play out where I showed how you could deploy the terminal image standalone in an OpenShift cluster of your own, without needing JupyterHub. The only thing missing right now is including the workshop notes and way to view it in that same image.

The deployment model used is therefore sort of similar to the second option above, except that you only get a container for your terminal instance as a container in Kubernetes, you aren't being given a complete set of VMs or cluster of your own. When you run the exercises, you would be working in the same cluster as the terminal was deployed, and the same cluster that other workshop attendees were using.

This approach works well with OpenShift, because unlike plain out of the box Kubernetes, OpenShift enforces multi tenancy and isolation between projects and users. If necessary, you can further lock down users and what they can do through quotas and additional role based access control, although the default access controls are usually sufficient.

Because of the multi tenancy features of OpenShift, it is quite reasonable goal therefore, to package up everything for a workshop in a container image, and allow them to pull down that image later and deploy it into their own OpenShift cluster, knowing that it should work.

As well as using an image to deliver up a self contained workshop as an image which can be deployed in any cluster, it could also prove useful for packaging up the instructions, and anything else required, for when demonstrating how to deploy applications in OpenShift to customers.

Image implementing a combined dashboard view

In creating a combined dashboard view, because a standalone terminal was still required for use with the existing workshopper tool, addition of a dashboard was done using an image of its own. Rather than this being completely from scratch, the base terminal image was designed in a way that it could be extended, with plugins being able to be registered with the proxy to add additional route handlers.

This way if it was decided to stick with the workshopper tool for the workshop notes, just the terminal base image would be used. If a combined dashboard view with integrated workshop notes was more appropriate, the dashboard image which extends the terminal image would be used.

To see how the dashboard view would look, you can deploy the dashboard image using:

$ oc new-app https://raw.githubusercontent.com/openshift-labs/workshop-terminal/develop/templates/production.json \
    --param TERMINAL_IMAGE=quay.io/openshiftlabs/workshop-dashboard:latest

This uses the same approach before of relying on the OpenShift cluster to perform user authentication, and only an admin of the project can access it. Once user authentication has been completed, a user is redirected back to the dashboard.

img-alternative-text

Although the dashboard image doesn't have any pre-loaded content for a specific workshop yet, you can see how on the left you have the workshop notes. On the right you have a pair of terminals.

In the workshop notes, you can have one or more pages, with pages grouped into sub directories as categories if necessary. You can then define how the pages are chained together so users are guided from one page to the next as they perform the exercises.

The content for the workshop notes can be specified using markdown formatting. In the case of code blocks, these can be optionally annotated so that if the code block is clicked on, it will automatically be copied to a terminal on the right hand side and executed. This saves the user needing to type the commands. A code block can also be annotated so that if clicked on, the content will be copied into the browser copy buffer. This can then be pasted into the terminal or other web page.

Embedding a view for workshop notes

In the dashboard view, the Butterfly application is still used for the embedded terminal view. As Butterfly supports multiple sessions from the one instance, it was a simple matter of referring to a different named session in each of the terminal panes.

For the workshop notes, like with Butterfly, I preferred to not write a half baked implementation of my own, so I opted to use a knowledge base application called Raneto which fitted the requirements I had. These were that markdown could be used, it supported variable substitution, supported page meta data, and allowed for the theme and layout to be overriden in templates and CSS.

Raneto even has some features that I am not using just yet which could prove useful down the track. One of those is that it is possible to edit content through Raneto. Unfortunately that feature doesn't work properly when hosting Raneto at a sub URL, but I have a pull request submitted to the author which fixes that, so hopefully editing can be allowed at some point for when you are authoring content.

In order to combine the workshop notes hosted by Raneto, and the terminal panes implemented using Butterfly, I had to write some custom code, specifically the dashboard framing, with adjustable sizing of panels. For this part, I relied on the fact that the proxy had been made pluggable and overrode the default page handler to redirect to the dashboard view. I then used PUG in Node.js express to create the layout.

People will know me as a Python fan boy and this was really the first time using Javascript, Node.js and express on anything serious. I must say it felt a bit liberating, although I had to rely on a lot of googling, and cutting and pasting of Javascript code snippets until I got it doing what I wanted. It could still do with a bit more polish and tweaking as there are still a couple of issues I haven't been able to solve due to a lack of understanding of Javascript and the DOM page rendering model.

Coming up next, adding workshop notes

In addition to being able to run up the dashboard standalone, you can also deploy it using JupyterHub for a multi user workshop environment. The next step therefore is to add your own workshop notes.

This is done in the same was as when extending the terminal to add additional command line tools, or source files, including the ability to be able to add a build script to run your own steps during the build phase. That is, using a Source-to-Image (S2I) build, or a build from a Dockerfile. The result is the same, a self contained container image, but this time adding the workshop notes and the way of displaying them in a single dashboard view.

In the next post I will explain how you would layout your content for your workshop notes, how to markup code blocks so they can be clicked on to be executed, and how to link pages together to create the path users should follow when working through the exercises.

Tuesday, January 1, 2019

Administration features of JupyterHub

You have seen now in the last post how you can use JupyterHub to deploy a multi user workshop environment where each user is given access to their own interactive shell environment in their web browser. This is by having JupyterHub spawn a terminal application instead of the usual Jupyter notebooks it would be used for.

The aim in being able to provide this out of the box experience, is that it avoids the problem of workshop attendees wasting time trying to install any command line tools on their own local computer that may be needed for a workshop. Instead, everything they need, be it command line tools, or copies of source code files, are ready for them and they can immediately get started with their workshop. This can save up to 20 minutes or more at the start of a workshop, especially if running the workshop at a conference where there is poor wifi connectivity and downloads are slow.

For this, we are relying on JupyterHub to co-ordinate user authentication and spawning of a user environment, but JupyterHub can do more than that, providing a means to monitor user sessions, including allowing a course instructor to access an admin page where they can see logged in users and control their sessions.

The JupyterHub adminstration panel

In order to designate that a specific user has administration privileges, when deploying the multi user workshop environment, you can specify a list of users as a template parameter.

$ oc new-app https://raw.githubusercontent.com/openshift-labs/workshop-jupyterhub/master/templates/hosted-workshop-production.json \
    --param ADMIN_USERS="opentlc-mgr"

The list of admin users can also be set after deployment by updating the ADMIN_USERS environment variable in the deployment config.

When a user is designated as an administrator, they can access the JupyterHub admin panel using the /hub/admin URL path.

img-alternative-text

From the admin panel, a course instructor is able to see all the users who have logged in and whether that users instance is currently running. If necessary they can stop or start a users instance.

If a workshop attendee is having some sort of problem and the course instructor needs to be able to see the error they are getting for the command they have run, or needs to debug an issue in that particular users environment, they can from the admin panel click on "access server" for that user. This allows the course instructor to impersonate that user and see the exact same terminal view as the user themselves sees. Each can enter in commands in their own browser view and the other will see it.

The admin panel provides the ability to perform basic operations related to users. For more control, JupyterHub also provides a REST API. This could be used for ad-hoc operations, or you could create a separate web application as an alternative to the bundled admin panel, exposing more of the operations which can be performed via the REST API.

Customising JupyterHub configuration

The workshop environment created using the template, and the image it uses, is intended to provide a reasonable starting point suitable for any basic workshop. If you need to perform heavy customisation for your own purposes, you would fork the Git repository and directly modify it. For simple configuration changes, it is possible to override the JupyterHub configuration by adding additional configuration into a Kubernetes config map for the deployed JupyterHub instance.

In the case where the application deployment is called terminals the name of the config map is terminals-cfg. You can place any configuration in here that JupyterHub or the components it uses understands, although what you may want to override is probably limited.

One example of what you can use the config map for, is to define a user whitelist. A user whitelist is used where you don't want any user in the OpenShift cluster to be able to access the workshop environment, but instead want to limit it to a set list of users.

img-alternative-text

Culling of idle user terminal sessions

The intent with the deployment and configuration is that it caters for the typical use case, providing default configuration for features that you would often want to be used. You can then override exactly how that feature works through template parameters at the point of creation, or by updating environment variables in the deployment configuration.

One example of a feature that comes pre-configured is idle termination of user sessions.

In the case of this feature, because JupyterHub is able to monitor web traffic passing through the configurable HTTP proxy it uses to direct traffic, it knows when a terminal session is no longer being used. This enables JupyterHub to shutdown the pod for the user session if the period of inactivity exceeds a certain time. This might be useful to reduce resource usage for terminal sessions which were never used.

By default the inactivity timeout is set to 7200 minutes (2 hours), but you can override it using the IDLE_TIMEOUT template parameter, or deployment config environment variable.

Coming up next, hosting workshop notes

The purpose of this post is to again show that by using JupyterHub we get a lot of features for free without needing to implement them ourselves. JupyterHub is very configurable though and so if necessary things can be tweaked even further. This includes for example being able to override the templates used to render JupyterHub pages such as the spawn progress page, control panel and admin panel. So if you wanted to give it your own look and feel or add branding, you could do that as well.

Getting back to the original problem of running a workshop, what you have seen so far deals with the issue of being able to provide each user with an in browser interactive terminal where they can work, with all command line tools they need, ready to go.

During the workshop, the workshop attendees still need the workshop notes for the exercises they need to work though. In the next post, we will look at how the hosting of workshop notes can be integrated with the workshop environment we have running so far.