Monday, December 31, 2018

Deploying a multi user workshop environment

In this fourth post of this series of posts, we finally get to how to deploy a multi user workshop environment using OpenShift, or at least, how to deploy an interactive terminal session per user accessible in the browser. Right now we are still working on the assumption that the workshop notes are deployed separately, but we will get to that in a later post.

From the second post in this series we know we could have each user log into OpenShift and deploy an instance of the terminal themselves, but that implies they know how to do that using just the OpenShift web console, or they need to be instructed how to do it.

In the interests of making things easy for attendees of the workshop at the beginning, a better workflow is to give them all the same URL. When they visit this URL, they would log in with the access credentials they were given, and be immediately dropped into their own terminal session. They can then proceed to follow the workshop notes and do the exercises.

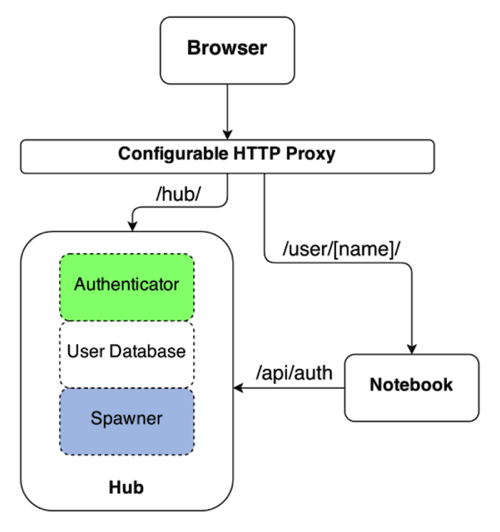
As already mentioned, the solution I am using to handle the user authentication and spawning of a per user environment is JupyterHub. The JupyterHub software is usually used to spawn Jupyter notebooks, but it can be used to spawn other applications as well.

When using JupyterHub for applications other than Jupyter notebooks, and access to the per user instance needs to be protected, the application will though need to authorise access by checking with JupyterHub that the user is allowed to access that instance. As described, this is already catered for by the terminal image. Similarly, the other requirement of the application being able to be hosted at a set sub URL is also handled already.

Deploying the JupyterHub application

Deploying JupyterHub to a plain Kubernetes cluster can be a fiddly process. The process for doing this which the Jupyter project team provides is by using a set of Helm templates, but Helm is not a standard part of Kubernetes. Thus it would be necessary if using plain Kubernetes to deploy Helm first.

When using OpenShift, instead of using Helm templates, when deploying JupyterHub it is possible to use native OpenShift templates instead.

The original OpenShift templates for deploying JupyterHub to OpenShift were created as part of the Jupyter on OpenShift project. You can find them as part of the JupyterHub Quickstart example repository.

That example repository is intended to get you started with JupyterHub on OpenShift. It provides the source code for a JupyterHub image that can be deployed to OpenShift, along with example templates.

For deploying our workshop environment, we will be using the JupyterHub image created out of that repository, but will be using our own templates, which combines the custom configuration for JupyterHub that we need, with that image, and then deploys it.

The command for deploying an initial workshop enviroment is:

$ oc new-app https://raw.githubusercontent.com/openshift-labs/workshop-jupyterhub/master/templates/hosted-workshop-production.json

You do not need to be a cluster admin to run this command. As long as you have an OpenShift user account and have a project you can use which has sufficient quota for running JupyterHub and an instance of the terminal for each user, you are good to go.

When the oc new-app command is run, it will create a deployment config called terminals, along with a bunch of other resources. If you want to monitor the progress of the deployment so you know when it is complete, you can run:

$ oc rollout status deploymentconfig terminals

When complete, you can determine the URL for accessing the workshop environment, the URL which you would give the workshop attendees, by running:

$ oc get route terminals

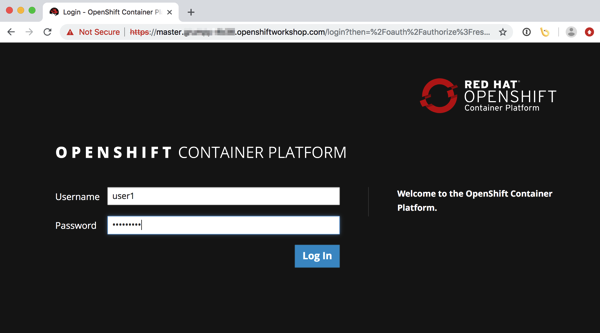
The template being used for the deployment in this case is setup to use OpenShift for performing user authentication. The workshop attendee when visiting the URL will therefore be redirected to the user login page for the OpenShift cluster, where they should enter the user credentials they were provided for the workshop.

img-alternative-text

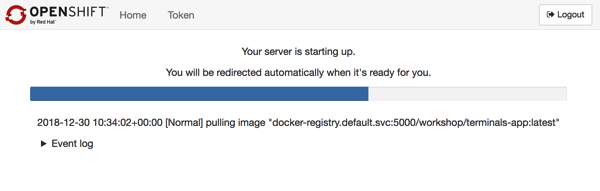
Once login has been completed, they will be redirected back to JupyterHub. If they are one of the first users to login and the terminal image hasn't yet been pulled to the node in the OpenShift cluster, they may briefly see a JupyterHub page which tracks progress as their instance is started.

img-alternative-text

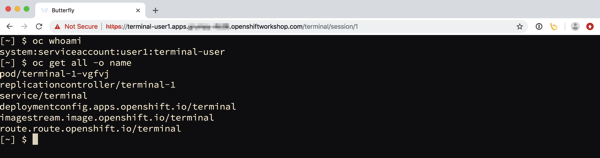
When it is ready, they will end up in the interactive terminal session in their browser. They will still need to login from the command line using their user credentials, but they will not need to indicate the address of the OpenShift cluster, as that has already been setup.

img-alternative-text

If projects have been pre-created for users, these will be visible, otherwise the user would need to create any projects as the workshop notes describe.

Persistent storage for user sessions

When running applications in containers, the file system accessible to the application is by default ephemeral. This means that if the container is shutdown, any updates made to the file system will be lost when a new instance of the application to replace it is created.

For a workshop, where exercises may involve creating or modifying files pre-populated into the image, this would mean loss of any progress and it would be necessary to start over.

Because this would be unacceptable in a workshop that may go for a whole day, the configuration for JupyterHub used with this template will allocate a persistent volume for each user session.

With how the terminal image is setup, the home directory for a user in the container will be /opt/app-root/src. A user can though write to anywhere under the /opt/app-root directory. As a result, the persistent volume will be mounted at /opt/app-root.

If you are aware of how file system mounting works, you may see a problem here. If a persistent volume is mounted at /opt/app-root, it will hide any files that may have been added in a custom terminal image.

To avoid this, when the user environment is started for the first time, an init container is used in the Kubernetes pod to mount the persistent volume at a temporary location. The contents of the /opt/app-root directory will be copied into the persistent volume from the image. For the main container, the persistent volume will then be mounted at /opt/app-root.

Using this mechanism, the persistent volume can be populated the first time with the files from the image. Any subsequent updates to any files under /opt/app-root will therefore be persistent. In the event that the users instance is shutdown, they need only refresh their web browser and JupyterHub will re-create the user environment, but where the workspace is using what was already saved away in the persistent volume, and so no work is lost.

Using your custom terminal image

When the template above is used to deploy JupyterHub for the workshop, it will by default use the workshop terminal base image. The image will provide a default set of command line tools, but will not contain any files specific to the workshop.

If a custom terminal image has been created using the steps explained in the prior blog post, this image can be used for the workshop, by passing its name as parameter to the template when deploying JupyterHub.

$ oc new-app https://raw.githubusercontent.com/openshift-labs/workshop-jupyterhub/master/templates/hosted-workshop-production.json \
    --param TERMINAL_IMAGE=my-workshop-terminal:latest

If the JupyterHub instance has already been deployed, you can override what terminal image it is using by setting the TERMINAL_IMAGE environment variable on the deployment config.

$ oc set env deploymentconfig terminals TERMINAL_IMAGE=my-workshop-terminal:latest

The value given to TERMINAL_IMAGE in each case, can be a full name for an image hosted on an image registry, or it can be a reference to an image stream and tag in the current project.

Coming up next, other JupyterHub goodies

I found JupyterHub convenient because it meant I didn't have to reinvent the wheel. JupyterHub could be setup to work with an external OAuth provider for user authentication, in this case the same sign on system as the OpenShift cluster was configured to use. Spawning and management of each users instance was also managed by JupyterHub, we just happened to be spinning up a terminal application rather than a Jupyter notebook.

In the next post I will go through some of the other built in functionality that JupyterHub provides. This includes its administration web interface and REST API, as well as its ability to the monitor web traffic passing through to a users application and culling of idle user sessions.

Sunday, December 30, 2018

Creating your own custom terminal image

In this series of posts I have been talking about some of the work I have been doing with creating environments to host workshops when needing to train users in using a software product such as OpenShift.

In the first post I explained how JupyterHub can be used to deploy web applications other than Jupyter notebooks, and how I use it to deploy user environments which give each attendee of a workshop, access to an interactive command line shell in their browser, with all the command line client tools and files they need for the workshop.

In the second post I delved into how the container image was constructed, as well as how it could be run independent of using JupyterHub where a user may want to deploy it themselves and wasn't running a workshop.

In this post I am going to explain more about how the terminal image is constructed and how it can be extended to add additional command line tools and files required for a specific workshop.

Contents of the base container image

In addition to the Butterfly application, which provides the interactive terminal in the browser, and the auth proxy, which handles authentication and authorisation, the terminal base image includes a range of command line tools that may be needed in the workshops.

As the main target of any workshops is going to be learning about Kubernetes and OpenShift, the command line clients kubectl, oc and odo are included. You also have commonly used UNIX command utilities such as git, vi, nano, wget, and curl, as well as tools required to work with specific programming languages. The language runtimes which are provided are Java, Node.js and Python.

When you run specific workshops, you may need additional command line tools to be available, or you may want a users environment to be pre-populated with files for the workshop. This could include a checkout of an existing remote Git respository, so the user will already have all the files necessary present, without needing to pull them down themselves.

In order to add these on top of the base container image, you can extend it using a Source-to-Image (S2I) build, or using buildah or docker builds.

Running a Source-to-Image build

A Source-to-Image (S2I) build is a means of creating custom container images. It works by starting out with a S2I builder image, running it, injecting source files into it, and then running an assemble script within the container which prepares the contents of the image being created. A container image is then created from the running container.

If you are familar with hosting services such as Heroku, or Cloud Foundry, which use what are called build packs, S2I is similar to that, except that S2I was purpose built to create container images. In fact, the S2I builder is itself a container image and in our case, the terminal image is what is called S2I enabled, and acts as the S2I builder image.

An S2I build can be run from the command line on a host where the docker container runtime is available, using the s2i tool. An S2I build can also be run inside of any container platform which supports it, such as OpenShift.

When using the s2i command line tool, you have two options for where the files you want to inject into the build come from. The first is that files can be injected from the local file system, and the second is for the files to be pulled from a hosted Git repository, such as on GitHub, Gitlab, or Bitbucket.

In either case, when the S2I build is run, the directory of files used as input will be placed in the directory /opt/app-root/src of the image. This is the same directory which acts as the home directory for a users session when they access the terminal session through the browser.

In addition to any files from the build directory or Git repository being available, you can also create other files as part of the build process for the custom terminal image. This is done by supplying an executable shell script file at the location .workshop/build. This script will be run after files have been placed in the /opt/app-root/src directory.

One use for the build script might be to checkout copies of a remote Git repository so that it is included in the image and thus available to the user immediately they access the terminal session. You might also pre-compile any build artifacts from the source code.

#!/bin/bash

set -x
set -eo pipefail

git clone https://github.com/openshift-evangelists/Wild-West-Backend.git backend
git clone https://github.com/openshift-evangelists/Wild-West-Frontend.git frontend

By pre-compiling build artifacts once as part of the image build, it avoids the need for every user in a workshop to have to run the build. The only time they would need to re-compile build artifacts is if they make code changes, and even then it would only be necessary to rebuild anything corresponding to the changes.

Note that to ensure that the S2I build of the image fails if any build step fails, you should include the line:

set -eo pipefail

in the .workshop/build script.

By including this line, the whole build will fail immediately any time one specific step fails, and you do not need to manually check the result of every step and explicitly exit the script if a step fails. Failing the build like this ensures that you don't unknowingly create and use an image where a build step didn't fully succeed, but the remainder of the build ran to completion anyway.

With any files you want to include in place, or any build script, if you had them in the current directory, you run s2i as:

s2i build . quay.io/openshiftlabs/workshop-terminal:latest my-workshop-terminal

If you had the files in a hosted Git repository, replace the directory path "." with the Git repository URL.

Once the build has finished, you can verify that the image has been built correctly using docker by running:

docker run --rm -p 10080:10080 my-workshop-terminal

and accessing http://localhost:10080.

img-alternative-text

If you were using OpenShift, and wanted to do the build in the same project where a workshop will be run from, you can use:


oc new-build quay.io/openshiftlabs/workshop-terminal:latest~https://your-repository-url \
  --name my-workshop-terminal

If necessary you could also use a binary input build and build from files in a local directory.

Building an image from a Dockerfile

If you don't want to use the s2i tool, but want to use buildah build or docker build instead, you can use a Dockerfile.

When using a Dockerfile you could manually perform all the steps yourself, but it is usually better to setup everything as if an S2I build was triggered and then run the S2I assemble script. In this case the Dockerfile would be:

FROM quay.io/openshiftlabs/workshop-terminal:latest

USER root

COPY . /tmp/src

RUN rm -rf /tmp/src/.git* && \
    chown -R 1001 /tmp/src && \
    chgrp -R 0 /tmp/src && \
    chmod -R g+w /tmp/src

USER 1001

RUN /usr/libexec/s2i/assemble

You do not need to provide CMD or ENTRYPOINT as these are inherited from the base image.

When ready, run buildah build or docker build to create the custom image.

Building a custom image using these tools from a Dockerfile would be necessary where you want to install additional system packages that can only be installed as the root user. This is because an S2I build is always run as an unprivileged user.

Defining steps for when the image is run

The .workshop/build script is run during the build phase when using an S2I build using s2i or when emulating it using the above Dockerfile. If you want to have special steps run when a container is started up from the image, you can supply an executable shell script called .workshop/setup. Depending on the environment in which the image is known to be running, this might run steps such as creating projects in OpenShift for use by the user, or set up special service accounts or role bindings, so the user doesn't need to do those things themselves.

Note that the .workshop/setup script can only define commands to run, it cannot be used to set environment variables that would be inherited by the users terminal session. If you need to set environment variables, you can create a shell script file in the directory /opt/app-root/etc/profile.d. For example, if using a Dockerfile build you had installed the Ruby package from the Software Collections Library (SCL), you would create the file /opt/app-root/etc/profile.d/ruby.sh which contained:

source scl_source enable rh-ruby25

This would activate the Ruby runtime and ensure that any appropriate environment variables are set and the PATH updated to include the bin directory for the Ruby distribution.

Coming up next, deploying the workshop

In this post we covered how the terminal base container image can be extending using the Source-to-Image (S2I) build process, or a build using a Dockerfile. It touched on some of the extension points used by this specific S2I builder implementation, but also when the image is run in a container. This isn't all the ways that the base image can be extended. How the web interface for the terminal can for example be customised will be covered in a later post.

The benefit of using a base image and then building a custom image on top which contains everything needed for a workshop, is that the image becomes the packaging mechanism for the content required, but also contains everything needed to run it standalone if necessary.

One of the issues that comes up with running workshops is that people will ask how they can do over the workshop themselves again later. If the only way to work through the exercises is to deploy the complete multi user workshop environment, that isn't necessarily practical. Because everything needed is in the image, they can run the image themselves, as was covered in the prior post. So if you wanted to allow attendees to do it again, you need only host the image on a public image repository such as quay.io so they can pull it down and use it later.

Now that you can see how you can create a custom terminal image with special content for a workshop, we will move onto how you could run a multi user workshop using JupyterHub. That will be the topic of the next post in this series.

Saturday, December 29, 2018

Running an interactive terminal in the browser

In the last blog post I explained that JupyterHub can be used to spawn instances of applications other than Jupyter notebooks. Because JupyterHub can also handle user authentication, this made it a handy way of spinning up distinct user environments when running workshops. Each attendee of the workshop would be given access to a shell environment running in a separate pod inside of Kubernetes, with access via an interactive terminal running in their web browser. This meant that they did not need to install anything on their local computer in order to complete the workshop.

For the interactive terminal, the Butterfly application was used. This is a backend Python application implemented using the Tornado web framework, with the in browser terminal support being based on term.js.

Butterfly being a self contained application provides an easy way of deploying an interactive terminal session to a remote system in your web browser without needing to implement a custom web application from scratch. It isn't a complete drop in solution though, the reason being that for authentication it relies on PAM. That is, it requires that it be run as the root user, and that a user and corresponding password exist in the UNIX user database.

For a container based deployment using OpenShift, because the default security model prohibits the running of containers as root, this meant that the existing container image for Butterfly isn't suitable. We also don't want Butterfly handling authentication anyway and want JupyterHub to handle it, albeit that we still need access to the Butterfly instance be authorised in some way.

The latter is necessary because although JupyterHub handles user authentication, once that is done, all subsequent web traffic for the users instance only traverses the JupyterHub configurable HTTP proxy, which doesn't authorise subsequent access to the users instance.

When deploying Jupyter notebooks behind JupyterHub, to ensure that subsequent access is correctly authorised, the Jupyter notebook instance will perform its own OAuth handshake against JupyterHub to get an access token for the user, determine who the user is, and then check whether the user should have access to that instance.

If a similar handshake is not done when deploying an application other than a Jupyter notebook behind JupyterHub, once a user has logged in, a second user could use the URL for the first users instance and wouldn't be blocked.

Access via a lightweight auth proxy

The solution which can be used to add the required authorisation handshake is to place in front of Butterfly a lightweight auth proxy. For the proxy, Node.js was used as packages were available which made it easy to create a HTTP and web socket proxy in conjunction with authentication/authorisation mechanisms such as OAuth.

With the proxy being a separate process, and using a different language runtime, many will argue you must use a separate container for the proxy, adding it as a side car container to the first container in the same Kubernetes pod. If you want to be purist then yes, you could do this, but to be frank, where building an integrated solution where the fact that a proxy was used should be transparent, and where deployment should be as easy as possible, it was simpler in this case to run the proxy as a separate process in the same container as Butterfly is running.

When running applications in containers, under most circumstances the application is the only thing which is running, and so you would run it as process ID 1 inside of the container. Because both Butterfly and the lightweight auth proxy needed to be run at the same time, supervisord was added to the container to manage running them. Having supervisord present, actually turned out to be useful later on when wanting to layer on extra functionality for displaying content in a dashboard, as well as for special cases where for a workshop it might be necessary to run additional local services in the container.

Deploying the terminal standalone

Discussion up till now has been focused on providing interactive terminals to multiple users at the same time for a workshop, using JupyterHub to control user authentication and spawning of the per user environments. Although that is a primary goal, we still want to enable a single user to create an instance of the terminal themselves in their own project in OpenShift, without needing to deploy JupyterHub.

This can be done in OpenShift using:

$ oc new-app --docker-image quay.io/openshiftlabs/workshop-terminal:latest --name terminal
$ oc expose svc terminal

You can then use:

$ oc get route terminal

to determine the public URL for accessing the terminal in your web browser. With access to the terminal, then login to the OpenShift cluster from the command line using your username and password, or with a token, and start working with the cluster.

img-alternative-text

This method of deployment is quick, but is not protected in any way. That is, you are not challenged to supply any login credentials to get to the terminal, nor is the connection secure. This means that if someone else knew the URL, they could also access it.

A slightly better way is to use:

$ oc new-app --docker-image quay.io/openshiftlabs/workshop-terminal:latest --name terminal \
    --env AUTH_USERNAME=grumpy --env AUTH_PASSWORD=password
$ oc create route edge terminal --service=terminal

This activates the requirement to provide login credentials using HTTP Basic authentication. A secure connection is also used so no one can sniff your session traffic.

img-alternative-text

This ability to secure access to the terminal works as use of HTTP Basic authentication was added as one option to the auth proxy, in addition to the support added for using the terminal in conjunction with JupyterHub.

Linking to OpenShift authentication

Having support for HTTP Basic authentication is only a little bit more work to setup and because it isn't linked to using JupyterHub, it means you can technically run the terminal image in a local container runtime using podman run or docker run and still have some access control.

For the case of deploying the terminal standalone to an OpenShift cluster, a better arrangement would be to use the same authentication system as the OpenShift cluster itself uses. This way you wouldn't have to worry about supplying a username and password at all when deploying the terminal, and you would use OpenShift to handle user authentication.

Because of the benefits, this particular scenario is also supported, but because it involves additional configuration that is not easily done when deploying from the command line, an OpenShift template is provided to make it easier.

To deploy the terminal in your OpenShift project using this method use:

$ oc new-app https://raw.githubusercontent.com/openshift-labs/workshop-terminal/develop/templates/production.json

This will create the following resources.

serviceaccount "terminal-user" created
rolebinding.authorization.openshift.io "terminal-admin" created
imagestream.image.openshift.io "terminal" created
deploymentconfig.apps.openshift.io "terminal" created
service "terminal" created
route.route.openshift.io "terminal" created

What is different for this deployment is that a service account and rolebinding are also created.

The service account is necessary as part of the mechanism for using OpenShift for user authentication, specifically the service account ends up being the client ID when using OAuth against OpenShift.

With this in place and the auth proxy configured to use it, it means that when you visit the public URL for the terminal, you will be redirected to OpenShift to authenticate.

img-alternative-text

You then login using the same credentials as the OpenShift cluster. Once that is successful, you will be redirected back to your terminal.

img-alternative-text

One difference using this deployment method is that since OpenShift is used to handle user authentication, and so can be viewed with a little bit more trust, as a convenience so you don't then have to login to the OpenShift cluster from the command line, this will be done for you automatically. This means you can immediately start working in the current project.

This works because the service account created to support the use of OAuth for user authentication is also used for the pod when deploying the terminal. That service account is also given admin rights over the project it is deployed in via the role binding which was created. You can therefore deploy further applications, or even delete the project.

Do note though that the service account is not a normal authenticated user. This means it cannot create new projects, it can only work within the current project. If it was necessary that through the service account access was needed to other projects, an appropriate role binding would need to be created in the other project to allow access. Alternatively, the user can login from the command line with oc using their own username and password, or an access token. The user could then access any other projects they are allowed to, or create new projects if that capability hasn't been disabled for authenticated users.

One other very important point. When using OpenShift for user authentication in this way, similar to what happens when the terminal is used with JupyterHub, it only authenticates the user, it doesn't then authorise whether that user should have access to whatever that application is providing access to. For this reason, when using this configuration, the auth proxy will only allow an OpenShift user access to the terminal in the project, if the user is themselves an admin of the project the terminal is deployed in. If a user only had edit or view role, or was not even a member of that project, they will not be able to access the terminal.

Coming up next, extending the image

In this post we got a bit side tracked from the goal of explaining how the terminal can be used with JupyterHub by looking at how the terminal image can be deployed standalone without using JupyterHub.

This is useful as you may not be running a workshop, but want a way of being able to develop with OpenShift on your own project using the command line, but in your browser, without needing to install any tools locally. In the steps above the command line was used to do the deployment, but you could have done it from the OpenShift web console as well, totally avoiding ever needing to deploy the command line tools locally.

For the current terminal image it includes command line clients for OpenShift 3.10 and 3.11. From the terminal it will use the correct version corresponding to the version of OpenShift the terminal is deployed to. Especially for workshops, you may want to install additional command line tools, or populate the image with files used during the workshop.

In the next post I will talk about how you can extend the terminal image using a traditional docker build, as well as using a Source-to-Image (S2I) build. After that I will return to talking about integrating the terminal with JupyterHub for running multi user workshops.

Before moving on though, one last warning. The current incarnation of the work being described here should still be regarded as being in proof of concept phase. Earlier iterations have been used in actual workshops, but the current refresh of the code base to create the terminal image and integrate it with JupyterHub hasn't yet been used in anger. So use at your own risk. Do your own due diligence as to whether you believe it is secure. Be aware that names of images or locations of any respositories used to create them still may change as a proper home is found for them.

Friday, December 28, 2018

Using JupyterHub as a generic application spawner

As part of my day job I occasionally need to give workshops on using OpenShift, Red Hat's distribution of Kubernetes. The workshop notes that attendees follow to do the exercises we host using an internally developed tool called workshopper. We host the workshop notes using this tool inside of the same OpenShift cluster that users will be working in.

To access the OpenShift cluster and do the exercises, attendees use the OpenShift command line clients oc or odo. They may also need to use kubectl. Because these are client side tools they would need to be installed somewhere where the attendees can run them, usually this is on their own local computer.

Requiring that attendees install a client on their own local computer can often be a challenge. This is because when dealing with enterprise customers, their employee's computers may be locked down such that they are unable to install any additional software.

A solution one often sees to this problem is to enhance the tool used to host the workshop notes to embed an interactive terminal which is then used through the web browser. Behind the scenes that terminal would be connected up to some backend system where a shell environment is run for the specific user accessing the workshop. Finally, in that shell environment they would have access to all the command line tools, as well as other files, that may be needed for that workshop.

In my case, modifying the workshopper tool didn't look like a very attractive option. This is because it was implemented in Ruby, a programming language I don't know. Also, because workshopper only hosted content, it knew nothing of the concept of users and authentication, nor did it have any ability itself to spawn up separate isolated shell environments for each user.

Rather than modify the existing workshopper tool, another option would be to swap it out and use an open source tool such as Open edX which already encompassed such functionality. A problem with using Open edX is that it has a very large footprint and is way more complicated than we needed. The OpenShift clusters we used for training might only be running for a day, and setting up Open edX and loading it with content for the workshop would be a lot more work and wouldn't provide the one click setup solution we were after.

After thinking about the problem for a while it dawned on me, why not use JupyterHub, a tool I was well familar with and had already done a lot of work with around making it work on OpenShift and be easy to deploy.

Now you may be thinking, but JupyterHub is for spawning Jupyter notebook instances, how does that help. Although the Jupyter notebook web interface does have the capability to spawn an interactive terminal in the browser, it would be a quite confusing workflow for a user to access it in this way.

This is true, but what most people who may have been exposed to JupyterHub probably wouldn't know is that you don't have to use JupyterHub to spawn Jupyter notebooks. JupyterHub can in fact be used to spawn an arbitrary application, or when we are talking about Kubernetes, an arbitrary container image can be used for the per user environment that JupyterHub creates.

What does JupyterHub provide us?

JupyterHub calls itself a "multi-user server for Jupyter notebooks". It is made up of three sub systems:

  • a multi-user Hub (tornado process)
  • a configurable http proxy (node-http-proxy)
  • multiple single-user Jupyter notebook servers (Python/IPython/tornado)

The architecture diagram from the JupyterHub documentation is shown as:

img-alternative-text

As already noted, you aren't restricted to spawning Jupyter notebooks, it can be used to spawn any long running application, albeit usually a web application. That said, to integrate properly with JupyterHub as the spawner and proxy, the application you run does need to satisfy a couple of conditions. We'll get to what those are later.

The key things we get from JupyterHub by using it are:

  • can handle authentication of users using PAM, OAuth, LDAP and other custom user authenticators
  • can spawn applications in numerous ways, including as local processes, in local containers or to a Kubernetes cluster
  • proxies HTTP traffic, and monitors that traffic, facilitating detection and culling of idle application instances
  • provides an admin web interface for monitoring and controlling user instances of an application
  • provides a REST API for controlling JupyterHub and, monitoring and controlling user instances of an application

With these capabilities already existing, all we had to do for our use case was to configure JupyterHub to perform user authentication against the OAuth provider endpoint of the same OpenShift cluster they were using for the workshop. Next we configure JupyterHub to be able to spawn an application instance for each user as a distinct pod in Kubernetes.

The workflow for the user would be to visit the URL for the JupyterHub instance. This would redirect them to the login page for the OpenShift cluster where they would log in as the user they had been assigned. Once successfully logged in, they would be redirected back to JupyterHub and to their specific instance of an interactive terminal accessible through their web browser.

This interactive terminal would provide access to a shell environment within their own isolated pod in kubernetes. The image used for that pod is pre-loaded with the command line tools so they are all ready to go, without needing to install anything on their own local computer. The pod can also be backed by a per user persistent volume, so that any changes made to their workspace will not be lost in the event of their instance being restarted.

So the idea at this point is not to try and augment the original workshopper tool with an embedded terminal, but to provide access to the per user interactive terminal in a separate browser window.

In browser interactive terminal

In some respects, setting up JupyterHub is the easy part as through the prior work I had been doing on deploying JupyterHub to OpenShift, I already had a suitable JupyterHub image, and a workflow for customising its configuration to suit specific requirements.

What was missing and had to be created was an application to provide an in browser interactive terminal, except that I didn't need to even do that, as such an application already exists, I just had to package it up as a container image for JupyterHub to deploy in Kubernetes.

The application I used for the in browser interactive terminal was Butterfly. This is a Python application implemented using the Tornado web framework. It provides capabilities for handling one or more interactive terminal sessions for a user.

Because I was needing to deploy Butterfly to Kubernetes, I needed a container image. Such an image doesn't exist on DockerHub, but I couldn't use that. This is because to ensure access is fully protected and that only the intended user can access a specific instance, you need to perform a handshake with JupyterHub to verify the user. This is the first of those conditions I mentioned, and what is represented by the /api/auth call from the notebook to JupyterHub in the JupyterHub architecture diagram.

A second condition was the ability to force the web application being created for each user, to be hosted at a specific base URL. This is where you see only web traffic for /user/[name] being directed to a specific notebook instance in the JupyterHub architecture diagram. Butterfly already supported this capability, or at least it tried to. The hosting at a sub URL in Butterfly was actually broken, but with a bit of help from Florian Mounier, the author of Butterfly, I got a pull request accepted and merged which addressed the problem.

Coming up next, the terminal image

To cover all the details is going to be too much for a single post, so I am going to break everything up into a series of posts. This will include details of how the terminal application image was constructed and what it provides, as well as how JupyterHub was configured.

I will also in the series of posts explain how I then built on top of the basic functionality for providing a set of users with their own interactive terminal for the workshop, to include the capability to embed that terminal in a single dashboard along with the workshop notes, as well as potentially other embedded components such as the ability to access the OpenShift web console at the same time.

As the series of posts progresses I will reveal how you might try out what I have created yourself, but if eager to find out more before then, you can ping me on Twitter to get any conversation started.